Not just for the treats and belly rubs and unconditional love. More because outside of thunder storms, skateboards, and men with hats and beards, my dog Chubbs didn’t worry about a thing (may he rest in peace). He wasn’t crippled with anxiety, up half the night crying for no goddamned good reason. Hell, on the day I took him to the vet for the last time, he was still as excited as ever to put on his leash and go for a little walk. Even though every single step pained him, he was still a loving and trusting faithful companion. Ignorance is bliss.
I, on the other hand, have spent the past 2 years worrying about everything. Will the house get broken into? Will my husband die while driving to work? Will the furnace break down or the basement flood? All these things are beyond my control, but I have wasted years worrying about every worst case scenario in graphic detail.
I became hyper focused on the notion that I might die during the ankle surgery that I had been waiting 18 months for (spoiler alert: I’ve had surgery and am very much alive). I had no reason to suspect that I wouldn’t make it. The surgeon had no concerns, and neither did the anesthesiologist. Of course, I also worried that I wouldn’t be approved for surgery, do to my being overweight, or having imaginary heart issues related to my stress about being denied surgery or possibly dying during surgery. It was this never ending circular logic that amounted to absolutely nothing but wasted days and puffy eyes.
I have no real advice to give here. Anxiety sucks giant hairy monkey balls.
I don’t have a good relationship with my family doctor, so going to see her for treatment options never seemed like a viable option. I also firmly live in denial, believing every single day that tomorrow would be better, and that today was just an anomaly. I had some success cutting out caffeine and reducing my alcohol consumption, which allowed me to sleep better, and I’ve always relied on exercise to moderate my mood. And, for full disclosure, when cannabis was legalized, I was able to use it to help me sleep, which, in conjunction with the lack of booze and coffee, really helped.
Since ankle surgery 7 weeks ago, I am way less anxious. I still generally avoid caffeine, and alcohol (for reasons mostly related to recovering from surgery), but a cup of coffee or a couple of drinks don’t keep me up all night anymore. I didn’t need much of the pain medicine I was prescribed, nor have I needed pot to help lull me to sleep.
Maybe my terribly painful ankle was manifesting as anxiety, keeping me up all night and driving me mad. Or maybe the thing I was most worried about is now behind me.
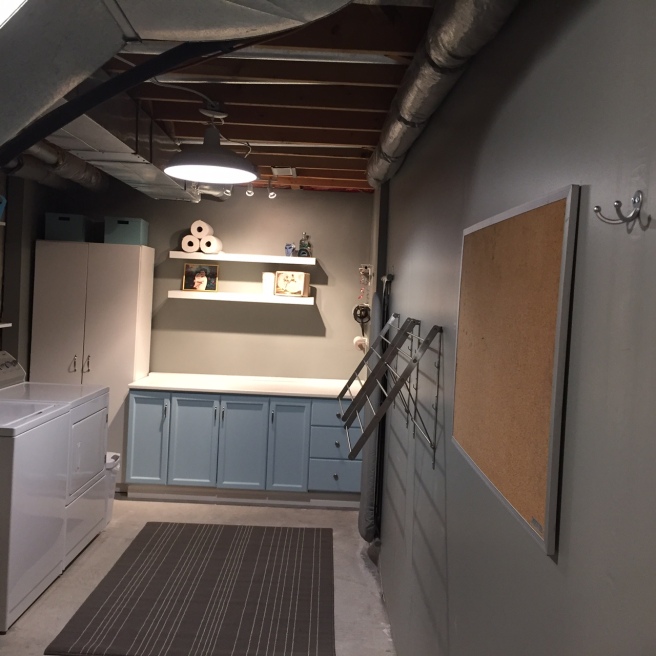
The workroom is almost finished, and I fucking impressed myself.
This small room in the corner of the basement went from a closed in, dark, cluttered, crowded, non-functional space to a bright, open, organized room that feels great to be in.
But how, Alicia? How the fuck did you do it?
Well, I started by taking everything out of the room. I ripped down the too-tall-too-deep work bench. I painted the walls with (homemade) Restoration Ivory by Sherwin Williams, and I gave the ceiling and the trim a fresh coat of white paint (also courtesy of paint mountain). I made a pegboard wall using some 2” x 1” strapping and 2 pegboards out of my garage. I got both of these tasks done on Friday evening, and spent about 4 hours doing so.
I don’t even remember where the pegboard came from, but I must have had it for 5 years or more. I followed the advice of Google and attached wood to the wall horizontally for support, spaced vertically every 12”, with 2” wood screws into the studs, and then attached the pegboard to the wood strapping with 1” wood screws through the pegboard holes, with washers to keep the screw head from going right through the holes. I’ll be honest and say that this was the hardest part of the whole damned room. I wanted everything to be level, but because the pegboard had been split in half, and because I’m only one person, I couldn’t get everything to line up exactly. The 2 pieces are about 1/16” off from each other. I’m pretending that it’s not killing me.
I was so freaking excited on Friday night that I barely slept. Saturday morning I leapt out of bed and went down to the mailbox to retrieve the pegboard hooks that Amazon delivered the day before. Like a child on Christmas morning, I couldn’t wait to tear into the parcel! Armed with a cup of coffee, I took my new toys to my (work)room to play with them. It took about 45 minutes to find all of the hand tools and painting supplies that I wanted to put up, and to fit them all in the space provided. I put the most frequently used things (screw drivers, pliers, hammers, clamps, level) close to the side where the work bench would soon go, and the less used tools higher up and farther away. We seem to have an entire paint store’s worth of supplies, so they got their own section, and because they needed longer hooks in order to keep like with like, they found a home away from the work bench and towards the laundry room door where they are less likely to stab me in the back while I work.
After the pegboard excitement and the caffeine buzz wore off, I went to Home Depot to buy the workbench and shelving unit. These items were a splurge. I had been agonizing over building shelves and a work bench, sketching and re-sketching a multitude of plans. I had an idea to use Ikea dressers as workbench bases, and to lay a countertop over those. In my mind it would have been great. But here’s the thing: I’m not actually great at building things from scratch. I can’t cut anything in a straight line. So I played to my strengths and threw money at the problem.
I bought this bench. It’s freaking fantastic. It assembled like a dream, and it’s over-engineered to all hell. With a 3000lb capacity, I could practically fix a car on it. The only drawback was that the box weighed 150lbs and I needed the pick up truck to get it home. Truthfully, I ended up unboxing it where it lay in the back of the truck and bringing it inside piece by piece.
I also bought this shelving unit. It too, was incredibly easy to assembly, and required nothing more than a hammer (though I splurged on a rubber mallet so that I didn’t deafen myself with the sound of metal hitting metal in a small enclosed space). I loaded up the tools and supplies onto the shelves, working strategically, with tools and heavy stuff at the bottom and the smaller, lighter items up high. Al got home from work around 3:30 p.m. on Saturday, and that’s about when I called it quits for the day and had a well earned nap.
Sunday morning started with a trip to Ikea for lights and a chair. If I’ve learned anything in the past year, it’s that a space feels better when it’s well lit and empty of clutter. We opted for this light because of its’ low profile. The ceiling in the workroom is low (81”), and my husband is very tall (75.5”), so the 3” profile means that Al can walk underneath it without having to duck. The lights are LED, so they’re not hot to work under either. Back home, Al jumped in and installed it for me because, well, he’s good at it. He’s also a better painter than I am, and had he painted the room and the ceiling, the floor wouldn’t look like a 2nd grader’s splatter paint art project, but whatever, I think it adds an artistic touch.
The room was still missing a spot for the small stuff, the nuts and bolts, screws and bits. A matching pair of shelves and a collection of plastic bins from Ikea were the perfect solution here. I spent a lot of time hanging the shelves, making sure that they were level and secure. How? I put a piece of painters tape on the wall at shelf height, using a level to check that the tape was level the whole way across. I then marked out where the brackets should go, and then screwed everything in place right over the tape. The tape got peeled away after the shelves were up. Please note that wall anchors are absolutely necessary unless you’re screwing into studs. But fuck those piddly little plastic doohickeys. Use ez anchors. Seriously. You can thank me later.
Oh, and how did I do?
Yup, I’m proud of this oneWhat’s left to do? well, the 4th wall, the one across from the work table. I want a bench of some variety, ideally with storage, but I haven’t found it yet. I’ve got some pictures to hang on this wall as well, and I have to collect the last few odds and ends that got cast out of the workroom, and find them new homes. The pictures might go up tonight. The bench….who knows. It’s not integral to the use of the space, nor the design, so I don’t need to rush it.
This week saw the workroom primed and painted and the ceiling patch job finished to the best of my ability. It looks pretty damned good, so long as you don’t look too closely at it.
I had been bugging my husband, the King of Paint Mountain, to pick a colour, any colour. We could go buy more paint if he had a specific colour in mind, or we could use what we already had. I have an over-abundance of self-confidence in many areas, but picking paint colours ain’t one of them. Last night I received my marching orders: mix the half can of grey with the half can of yellow. If it’s too green, add some of the red. Seemed simple enough.
Of course the cans were rusted shut. Of course I had to use all of my powers of persuasion (ahem, brute force) to pry them open, and of course they were starting to dry out. I ended up pouring the contents of the grey and the yellow into an empty paint can and stirring like crazy. As predicted, the colour looked a little green, but I ran out of fucks to give. During application, the paint was definitely a little chunky. Intellectually, I know that I could have strained the paint through some nylons to rid it of its’ gross clotty bits, but again, that was a bridge too far. Instead, I grumpily picked them off the wall and then re-rolled the finger marked sections while simultaneously anointing my pants with goopy paint clots and assorted handprints. My ass looked like something you’d hang in the Museum of Modern Art: a weird, lumpy, three-dimensional work of art that some would attribute great meaning to, and others wouldn’t understand. I can picture my husband standing in front of it, hand on his chin, musing “I don’t know what it means, I just know that I like it”.
Two coats later, and the colour looked pretty good, not quite as green as it did in the can. I busted out my Sherwin Williams fan deck and unilaterally decided that the colour was most definitely Restoration Ivory (6413). Not bad for DIY greige.
The trim needs a fresh coat of white paint, and some TLC to nudge it back into position where it has pulled away from the wall, and the ceiling could use a touch up over the patch, and to fix the spots where I failed to cut in nicely (fine motor skills aren’t my strong suit), but I think we’re nearing the end of the dirty work. I’m hoping to be done all of this tonight.
This weekend will require a trip to Ikea and Home Depot and some ‘some assembly required’. I’ve got a pegboard wall to get up, and then we get to load the room back in. After that, we’ll switch out the light fixture. Are you still paying attention? Listen closely. Do not put up a new glass globe light fixture BEFORE you finish construction. You can thank me later.
And yes, the irony of buying a workbench FOR A WORKROOM instead of building one because I’m not very good at construction is not lost on me.
Left to my own devices this weekend past, I started a new room makeover at the house. The workroom, long the eyesore on the way to the (now fabulous) laundry room, has been begging for attention.
Originally put together with the best of intentions and the smallest of budgets, its’ space was mostly occupied by a too large workbench, built with love but not much skill by my husband. He’s 6”4’, so the 38.5” high work bench which was more than 28” deep was not practical for the averaged height user (me). I could barely reach all the way to the back, and it was too tall for me to easily hoist things onto. If a toolbox were on top of the work bench, I couldn’t see all the way to the bottom of it, which is really not helpful when you need a screwdriver and you fucking need it NOW.
Why yes, that is a kitty litter bin with a jigsaw box inside it, why do you ask?It also became a dumping ground for homeless items, with newer stuff perched at the front and older items shoved to the back. Nothing had a designated home, so nothing got put away.
I had tried to impose order with wire mesh drawers left over from an Ikea closet system no longer in use, but the wide gaps in the mesh left items falling through, and the precarious way the drawers fit into the rack meant that the whole set up was likely to fall down at a moment’s notice. It was less than ideal.
So, with the house to myself, I got in there and got dirty. Everything had to come out. The nuts, bolts, screws and nails were gathered up and put together. The tool boxes (yes, plural), were closed and moved out. Power tools went back into their bags and boxes. Pictures came down and rugs came up. Christmas ornaments (mine) and sports trophies (his) were moved out to find a new home or the bottom of a garbage bin. The workbench itself was ripped from the wall. It was exhausting work.
I managed to find a pattern that worked for me though. I’d work for a few hours, cursing and sweating in the dark red room, then come up for a break (read: snack). During my break (ahem, snack), I’d start planning the new space. What did it need? What could it do without? What didn’t work about the current space and what could I do to fix it for the next one? Oh, and of course, what could Pinterest inspire me to create?
This. I want this.Inspired and nourished, I’d head back down to the basement to keep at the demo for a another hour or two. In total, I did this 3 times on Saturday and another 3 times on Sunday.
Once the room was empty (save for a deep freezer which needs more than one set of hands to move, and it needs a new home before it can vacate the old one), I got ready to patch, prime, and paint the space. Of course, I had already unearthed a spot of mould from a leak a few years ago (ewww, but also, what the hell did I think I would find?). I saw, up close and personal, the bad patching job we did when repairing drywall after an even earlier plumbing malfunction.
Mostly empty and none too clean.So painting was delayed while the ceiling got another coat of mud and the mouldy spots got washed and primed. The walls eventually turned from red to white(ish). Tonight I’ve got to sand the ceiling and give it another skim coat of mud. I was lucky to be able to pull a gallon of primer out of the paint library (formerly known as paint mountain). I don’t know if I will be so lucky with wall colour, but we’ll soon find out. My husband makes far better colour choices than I do, so I’m best to leave it to the expert.
I made a joke on facebook about how my husband would come home and roll his eyes at me. Someone asked why he wouldn’t be happy and appreciate my efforts? Why? Well, because, in typical Alicia fashion, I threw myself into this without real advanced notice. He knew this tornado was coming, but I didn’t sound the alarm first. With everything pulled from the workroom, the rest of the basement is an absolute disaster. The rebuild will require time and effort, and not just mine alone, so whatever my hubby had planned for the next few weeks, he’s instead going to be stuck helping me move heavy things, and our spending money is going to go into shelves and drawers and construction materials. I’m lucky he doesn’t do more than just roll his eyes at me. If the scene was reversed, I would lose my everloving shit on the person who tore part of my house apart and denigrated the things I built with love.
But there will be an upside. The laundry room makeover last year inspired me to take back my house from the clutter. I don’t need to live with spaces that don’t make me happy. In fact, the garage got a similar treatment this year. Once full from front to back, it got a facelift and some organization. There’s now room for a car to park in it. I mean, we don’t, but we totally could if we wanted to.
So I have high hopes for the workroom.
I learned from the laundry room makeover that everything feels better when it’s clean and well lit, so those are the first priorities. Before I go spending money on small scale solutions, I’m going to make 100% sure that my plan will work. Oh, and I need to know what colour it’s going to be, because even a workroom needs a ‘feeling’.
I used to go to this really amazing yoga class taught by an instructor whom I absolutely adored. The class had everything going for it. It was well organized, near to home, affordable, not too serious, focused on developing skill, and I had company in the form of a dutiful friend to join me every week. The instructor was a charismatic middle aged woman who was by no definition thin. She was strong. She was bendy. She was my god damnend hero.
The class followed a pattern: sun salutations followed by standing balance poses. Then came core work, back bends, inversions, a static stretch or too, and then shavasana. We were encouraged to try new things, and were given helpful instruction, props, and even the guiding hand of the instructor. Under her tutelage I learned to wheel (but not to deal) and even started to headstand. Plow pose was a regular part of her practice, and it became part of mine too.
Now, being of comic book proportions, inversions always bring me a fair amount of self-motor boating (because gravity is a bitch) but plow was the WORST. The curled over chin-to-chest posture made for some serious laughs (once my airway was clear again). It was fine. I’d rock and roll upside down and my tits would fall down towards the earth. A quick shake of my chin and they’d part ways and head towards my ears.
Of course, this was 9 years ago. A shoulder injury sidelined my practice for a while. My local yoga studio closed and the instructor disappeared from my radar. Other classes just weren’t as fun. It wasn’t you, yoga, it was me.
I tried again over the years, but it was never the same.
Lately I’ve been working yoga back into my activity rotation, by taking in 1 or 2 classes a week since January. My super swanky gym offers tons of classes of varying styles all included in my membership and it’s been going well, generally. I’m sticking to the beginner stuff, not wanting to get discouraged by feeling like I can’t keep up, but there are some more advanced things that I miss. The classes I’m taking don’t offer a lot in the way of hands on instruction, and they do none of the fun inversions.
“So, how do I get from where I am to where I want to be?”I thought to myself. Clearly the answer was to start trying stuff more advanced poses on my own to learn it all again, so that when I’m prepared to jump into more challenging classes I’ll be ready.
And then I stalled for a few more days. I mean, googling is the same thing as practicing, right?
Last night I bit the bullet. I was still dressed in my workout gear, though by 10:00 pm. it was scented with grilled chicken and sweat. I made some space on the floor and set an intention to try shoulder stand/modified plow, and a modified head stand. Head stand came first and it was an abject failure. My feet slipped on the dog scented carpet and I had trouble stacking my hips over my shoulders. I gave it a couple of good attempts to see where I was at, without judgement (who the fuck am I kidding, I was totally judging myself) and then I moved on. Next came shoulder stand. I tried it the proper way, using only my core to pull my hips skyward but 2 fucking inches does not a shoulder stand make. Fine. Let’s rock and roll our way up. 1-2-3…almost, 1-2-3…better, 1-2-3….eeeek, hold it! This is good! Legs up, core engaged, neck long, now drop your toes towards the smelly dog carpet, and a little chin wiggle to move my boobs to either side of my cheeks. Wait…I CAN’T FUCKING BREATHE!
Motherfuckingfucker who put these tits in my face and why aren’t they moving? Seriously, the space between my boobs became a vacuum that pulled my face in and wouldn’t let it go. I rolled out of the pose and contemplated a coroner’s report saying that I accidentally suffocated on my own breasts.
Why didn’t it work? What had changed? I’m fatter, sure. But not by a heck of a lot. I counteract that by wearing a better sports bra now then I every did before. The thing is built like a flak jacket. It holds my boobs high and tight and doesn’t let them get wild and out of hand, god bless it.
I tried the posture again, and again I nearly died. It must be the fucking bra.
By then I was exhausted, winded, and while buoyed up by being able to do a shoulder stand, I was blue (figuratively and possibly literally) from nearly suffocating in the process.
Until last night, I’ve never thought that a good bra might cause more problems than it’s worth, but tonight, when I try the poses again, I’m going to find a spot where my feet can grip the floor, and I’m going to ditch the flak jacket.
How’s that for a clickbait headline? I guess I could have also started with “One weird trick with a thimble that might just save Christmas” but that seems a little extreme.
But anyways….I can’t be the only person who goes a little overboard with Christmas baking. I just can’t fucking help myself.
In the past few years I’ve baked fewer and fewer “no good reason, just because it’s Tuesday” sweet treats, opting instead for long braising stews and quick cooking breads, but come December, when it’s literally dark for 14 hours a day and people are cutting down perfectly good trees and dragging them indoors only to electrify them and cover them in soon to be broken glass and cat butt floss, I get festive in the kitchen baking cookies for Christmas.
My favourite Christmas treats aren’t generally crowd pleasers, but IDGAF. I love my grandma’s coconut tart recipe, and I have fond memories of being 11 and eating them directly out of the deep freeze in the basement in December, to the point that there might not have been any left on the 25th. Whatever. Mom made them for me anyways. I also love sugar cookies, but I’ll have to find a different recipe, because we learned last year that not all cookie recipes are created equal.
The rest of the selection will vary. A few drop cookies, a bar of some variety, something chocolatey, something with raisins and spice, maybe something boozy. You know, the old/new/borrowed/blue of Christmas baking.
This year’s line up looks something like this:
Coconut tarts
Butter tarts
Sugar cookies
Thimble cookies
Nanaimo squares (that I made for the first time last night but haven’t tried yet, so if they taste like crap they’ll see the bottom of the green bin and we will never speak of this again).
Hermit cookie, but without the dates, because I fucking hate chopping dates and I just don’t want to do it anymore, no matter how much my father-in-law likes them the way I used to make them.
Aside from the Nanaimo bars (which will get replaced with my tried and true brownie recipe if they’re an abject failure). I’ve made the pastry for the tarts. I’ve made some oatmeal cookies that are just to keep me from eating the rest of the Christmas baking, and I’ve made Thimble cookies.
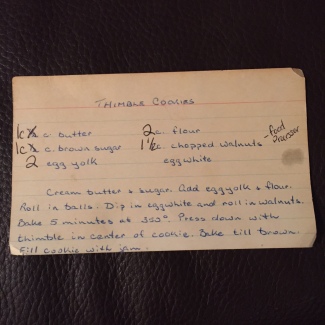
The thimble cookies are a family recipe. As I understand it, when my mom moved out when she was about 18 to go to university, she wrote out some of her mother’s recipes on index cards. Some 50 years later, I still have these cards. I’ve only ever made a handful of the recipes. Most are, at best, a list of ingredients and some basic cooking instructions. These were familiar recipes to my mom, and they wouldn’t have needed much explanation. I definitely remember her adding extra details for me when I took over the baking responsibilities in our family when I was 13 or 14.
I’ve made the thimble cookies before, but of course, ever time they turn out a little different. The recipe calls for rolling the cookies in crushed walnuts, but I went for almonds this time because, well, because I like almonds more. For the jam, I found a jar of low sugar strawberry in the pantry that I had made at the beginning of 2015. As I made jam again this year, it was lingering on the back of a shelf, no longer the newest or most exciting thing out there. It was part of the batch that didn’t quite turn out, having gotten too thick, but it was just what I needed for these cookies. And now that it’s open, the rest will surely go to good use sweetening up my plain yoghurt, or maybe filling some cornbread muffins in the new year.
The instructions should say “Don’t make the hole too big. Remember that cookies spread”.
But back to the thimble cookies. Mix the dough, roll the dough balls around in the egg white, toss them in chopped almonds, and onto the baking sheet. But here came the key questions: Do I bother to go and find a thimble or do I just use my finger. Adding to the (growing longer) list of things I had forgotten about this recipe, you have to bake the cookies for 5 minutes before making a hole in the middle. So yes, I did need a thimble.
Okay, throw them into the oven and go and find a thimble.
Thimble in hand (or rather, on index finger), I pull the baking cookies from the oven and make a small indentation in the top. But it doesn’t look big enough. I tried doing a wiggle move with my finger, but that caused the sides of the cookie to split. I ended up going with a tamping motion, making a hole with sharp sides but a bottom that was larger than the size of the thimble.
Of course I fucking forgot that cookies spread when they bake, and all my efforts for larger holes took my cookies from having a nice innie belly button to one of those strange taunt flat belly buttons you often see on folks with less than 5% body fat. Where the hell are you supposed to put the jam on one of those?
I had to mound the slightly too stiff low sugar strawberry jam on the spread out thimble divot. They’re not the most beautiful thimble cookies ever made, but that’s not the point. Perfection is not the point. If I was only willing to accept perfection I’d never bake, or cook, or clean, or, I don’t know, leave the house.
I bake at Christmas because I get to look at my mother’s handwriting. I bake at Christmas because I come from a long line of women who can, and have, and still do, stand at the kitchen counter and bake all day, so that there is always a treat in the freezer for when someone comes to visit. They even know enough to bake extra, so that you can steal one or two from the deep freeze as you walk by and there will still be some leftover for guests.
Baking is my Christmas tradition. The tree thing is lovely, and we can all get behind that receiving thoughtful gifts thing, but as I have no children and don’t usually host the Big Day, I don’t really get behind decorating for Christmas, or obsessive shopping for the perfect present. I can’t sit still long enough to watch most Christmas movies, and while carols are lovely, they wear out their welcome pretty damned fast. Outside of getting drunk and crying, baking IS my festive spirit.
I froze most of the thimble cookies in order to give them a fighting chance of lasting until Boxing Day. If I keep at it, there will be enough for leftovers on the 27th.
It started out with the best of intentions. Someone, somewhere, posted that they and a group of like minded booty-thusiasts were going to complete this squat challenge, and the perky assed infographic showed up in one of my social media news feeds, and well, it seemed like a good idea at the time.
Of course, I wasn’t going to do it alone, so I sent it to my workout buddy on day 3 with a text that read something like “oh, btw, we’re doing this and you’re 3 days behind schedule, so you’ve got 60 squats coming at you today”.
The problem is that these things are called challenges for a reason.
Other than occasional forgetfulness, the first half was no big deal. Between my roller derby past and my comfortable relationship with the gym right now, I was sure that I’d be all over this one. 20 bodyweight squats? No problem! 100? Is that all you’ve got (no, the answer here is no).
The problem wasn’t starting the challenge, or even maintaining it. The problem now is that I have to fucking finish it. Each day is a chore. It takes serious time and effort to bust out almost 200 squats. I’m squeezing in sets in the bathroom, or while my coffee is brewing at work. I’ve been caught squatting so many times now that it no longer phases me.
It also hurts. You may recall that I have a surgically reconstructed ankle with enough metal in it to raise eyebrows (and pant legs) at the airport, and after an ACL tear and reconstruction, my left knee could be generously referred to as crunchy at best.
Sidenote: about halfway through the month, my workout buddy and I decided to invest a significant part of our workout efforts to improving our ass-to-grass squats. She has similar mobility issues to me, and if either of us were to previously drop it like it’s hot, we sure as hell couldn’t pick it back up again, not without an assist. After a few weeks of concentrated effort, I’m not quite yet getting tush to turf, but I can certainly get low enough to fart on your garden gnome. So I’ve got that going for me, which is nice.
We’ve spent most of November squatting, all the while improving our form, but even with this effort, we managed to fall 5 days behind schedule. It’s December 2nd, but we’re only on day 27 of 30. I think I spend about 15 minutes a day squatting now, but it feels like it’s 24/7. Oh, and let’s not forget that all of this is on top of my thrice (or more) weekly trips to the sweatatoreum.
I feel like I’m constantly trying to rally the energy and mental fortitude to bust out another round of 20 or 30 squats, and I’m usually stuck looking for quiet moments alone in which to do so. My knee and ankle hate me. My underbutt is permanently sore.
I don’t remember my life before the squat challenge, but with only 3 more days of active squatting (currently planned for Sunday, Monday, and Tuesday), I’m beginning to see the finish line. I find myself asking “what comes after a squat challenge?” because I’ll tell you a little secret…while derby butts are fantastic gravity defying structures, they are not eternal. For every retired skater, there is an ass that is slowly but surely falling and flattening.
I must have been missing my derby butt to have signed up for such squat challenge foolishness. I will admit that at some point this fall I was checking myself out in a mirror (as I often do, because, c’mon, look at me) and noticed that my ass wasn’t all that it used to be. I’ll also admit that having done more than 1,900 squats in the past month has certainly perked up my posterior. So, with the end in sight, I’m left wondering. What are maintenance squats? How many squats do I have to do every day, for the rest of my life, in order to keep up my derby ass? 50? Do I need to do them every day? What about a monthly target instead? Will 1,500 squats every 30 days be enough? Am I willing to do 18,000 squats a year, for the next 56 years, to ensure that when I’m 92 years old I’ll still be able to fill out a pair of jeans leggings? That’s over a million squats.
I guess the lesson I’ve learned is that I shouldn’t do everything I see on facebook. If you’re going to ignore this very valuable advice, then I alternately advise you do to absolutely everything you see online. Knit the sweater, bake the cake, make a million and a half easy crockpot meals, vote, protest, stage 19 elves on shelves and 3 troopers on poopers. Get a puppy. Get a million cats.
And don’t forget your ugly Christmas sweater (are we still doing that?).
Now if you’ll excuse me. I’ve got to get squatting.
Let me remind you again why I’ve spent 4 weeks telling you about my laundry room. It was gross. I hated it. My workout buddy Becky Chekan is a kitchen designer. She offered to help me make it positively dreamy (her words, not mine). I said yes.
But seriously, you may be saying to yourself, why the heck does this matter so dammed much?
I’ve been told that some people have emotional attachments to cars. They think that it’s not worth it to spend time driving to and from work every day in a car that they hate. Other people will spend hundreds of dollars on running shoes, because uber comfy runners add value and enjoyment to their daily work out (and possibly actual measurable increases in performance). My laundry room was an unnecessary misery for me, and after living in the home for 11 years, I finally decided to throw some money at it to turn it into something I would enjoy spending time in.
Please don’t judge me by my filth. I forgot that I promised to post before photos.Seriously, look away. Let us never speak of this again.
Clearly I could not have done it without the help of a designer. I know this because I had tried many times to make the space better, but I lacked the vision to take it all the way. I was so caught up in how ugly it was that I couldn’t see that it needed 8 sheets of drywall, 3 coats of paint, 2 new light fixtures, a set of drawers, and a countertop to take it to the next level. Becky was able to create a plan of the finished product, and then help me get here. She even helped me shop for the items that would work for my space and my budget.
She helped me out of the goodness of her heart, but she did it well because this is her job.
This is my shameless friend plug: If you have a project like this, consider bringing in a professional designer, such as Becky. If you’re in the Ottawa area, give her a call, or swing by Urban Home Design & Custom Kitchens on Stittsville Main Street and have a coffee with her and chat about your ideas.
You had better believe that I’ll be hiring Becky again for my next project. I mean, I never did get around to cleaning out my garage this year. Oh, and you’d best believe I’ve started saving my pennies for a new kitchen.
But back to the laundry room.
I can’t believe how close we got to making the space look like her design:
The PlanThe reality. Pretty darned close to the plan.If you’re not excited about a place to store your laundry soap that’s in reach of the washing machine, then we are very different people.
SEE!!!!!
What I got out of the room, other than a warm and fuzzy feeling that comes from a beautiful and functional space, was a large work surface for folding laundry or crafting things, storage in the cupboards, drawers, and pantry, storage on the shelves, a fun wrapping paper thing, a place for my ironing board, a place to hang wet clothes to dry, and organization for paint mountain.
Paint mountain? More like paint mole hill!
I’ve spent more time in this room in the past month than I might have in the past 10 years. All it needs now is a radio.
I consulted with local realtor, Aron Cheney, of Keller Williams VIP realty, to find out if and how we’ve improved the value of my home by undertaking this project. Below is a lightly edited synopsis of our conversation.
Q: How do we attribute value to small home renovations such as my laundry room update?
A: There are 3 ways to assess the value of home renovations:
1. Cash return evaluation:
To make this an accurate real-world valuation, you would need to consult with multiple professionals and obtain quotes on the labour and material costs. 30% mark up on materials and $40/hour labour are for example purposes only:
($800 in materials + 30% markup) + (aprox. 30 hours of labour @ $40/hour) = aprox. $2240, with retained earnings of $1440 (total – cost of materials)
2. Value added return evaluation:
By doing this type of renovation, you are improving the likelihood of a Buyer making an offer on your home. When you improve an aesthetic aspect of your home, you send a message that you care about the home. The Buyer will translate that sense of care to other parts of the home, perhaps forgive aspects that are in poor repair and, in turn, pay more. You will increase the relative number of buyers who will be interested in buying your home and increase the relative price they are willing to pay (relative to what they would be had you not done the renovation). When it comes to market value, this what minor repairs and renovations are for, in my opinion. Low cost, high labour, low skill. The payback comes when you go to market and the effects are difficult to quantify but they are real.
3. Homeowner Enjoyment value:
You can’t easily put a price on it, but its highly valuable. The value of the lived-experience tends to outweigh the potential for cash profit down the road.
If you have any questions about Ottawa real estate, the value of your home, or whether or not you’d look good with a shaved head, please contact Aron at www.aronchaney.com
I learned a lot with this project, and I’d like to share some of this new #knowledge with you:
If it feels dark and dingy, add more light. This made so much improvement to the feel of the space.
Just clean the damned thing. I hated it so much down there that I would never ever ever clean it. The dust bunnies had a harem of concubines. The dirty laundry sink was unfit for anything other than washing paint brushes. All it took was a good scrub (or 3) to bring it back to a reasonable state of cleanliness.
While you’re at it, level the wobbly things. Things come with adjustable feet for a reason. Use them. Don’t forget to clean down here while you’re crawling around on the floor leveling things (like that laundry sink).
If you’re not sure where to start, empty the room of everything you can lift. Once the room was empty, I could start to see what Becky had in mind. When it was full of dirt and crap, I thought it was hopeless.
Let it go. Whether it’s 5 boxes of hardwood flooring left over from 6 years ago, or paint cans without labels, if you haven’t used it like you intended, sell it, give it away, or pitch it. Whatever you do, don’t put it back. You don’t need it. LET IT GO.
Don’t believe everything you see on Pinterest.
Do believe some things you see on Pinterest. Yes, you can write on an enamel surface (like a washing machine) with a dry erase marker. It’s a great way to remind yourself of what you’ve washed that might need to be hung up to dry.
Measure twice, and then measure again, and then maybe again. Ask yourself if you’re really sure of your measurement. Maybe you should check it again. Don’t cut anything until you’re absolutely ready to live with your decision.
And finally, what I spent and how long it took:
$40.00 – Drywall
$110.00 – Restore (lower shelves, tall pantry cupboard)
$275.00 – Ikea (shelves, counter, light fixture, hardware, rugs, accessories)
$50.00 – Miscellaneous hardware (screws, lumber, etc.)
$25.00 – Wiring and electrical material
$150.00 – Designer
Free stuff – paint, some lumber, some drywall, some hardware, a light fixture, 3 existing cabinets, existing shelf hardware, some accessories. $650.00 – Total cost (plus labour)
Total time: 8 days spread out over 4 weeks
Day 1 – measure
Day 2 – empty the room
Day 3 + 4 – drywall and prime
Day 5 – shopping, painting
Day 6 – electrical and some assembly required
Day 7 – installation
Day 8 – touch ups and finishing touches
So that’s it. We’re done. I’ll get back to filling mason jars with delicious things and baking bread and reading old cookbooks just as soon as the weekend is over and the laundry is done.
We worked all day to get the laundry room nearly done. It didn’t go quite as smooth as we had hoped, thanks in part to crooked walls, slopes floors, recycled cabinets, and general human error.
But we ended up getting to about 90%. I don’t know how you did in school, but if I got a 90 in anything, I would brag about it to anyone who would listen. What I’m saying is that if I never finished the few small tasks that are left, I’d still call the room a success.
By the way, it helps to have handy friends. If you don’t have any, you should really get some. No, you can’t have mine. If you ARE the handy friend, you are a champion. Bring your tools and I will feed you every time you fix or build something for me.
With the help of my handy friends, we (they) built up the short bank of drawers, secured the cabinets, installed the counter, hung shelves, hung drying racks, and put up hooks for the ironing board and a little wrapping station that Pinterest told me I needed to have.
As I said, we’re at about 90%. I still need to paint some trim, touch up the walls, and possibly paint the floor.
However, it’s so pretty that I wanted to show it off.
Hopefully by the end of the week it’ll be all done. I’ll update the budget and post some final photos, along with a list of what we bought, and what it all cost.
Now if you’ll excuse me, it’s Sunday night and I need to do the laundry.
The cupboards have been given 2 coats of paint, as have the new walls, and all of my clothes and exposed skin.
We wired up 2 new light fixtures with only 2 trips to the hardware store. I “some assembly required” some IKEA shelving to make paint mountain my bitch. It only took half a pot of coffee and 1 toenail.
Later today the counter is going to get a haircut so that it’s ready for its first date with the laundry room.
Still to do:
Install the cabinets, countertop, and floating shelves. Install shelves above the washer and dryer. Possibly paint the floor. Put on the cabinet hardware and hang the drying racks. Make it look pretty.
Oh, and pro tip: if you’re going to brave IKEA on a Saturday, take a friend and a tape measure. I may live in Canada, but I still measure length in inches. Paint mountain, you don’t scare me any more.


![IMG_2901[1]](https://busterup.files.wordpress.com/2017/10/img_29011.jpg?w=656)
![IMG_2888[1]](https://busterup.files.wordpress.com/2017/10/img_28881.jpg?w=165&h=219) .
.![IMG_2889[1]](https://busterup.files.wordpress.com/2017/10/img_28891.jpg?w=225&h=300)
![IMG_2900[1]](https://busterup.files.wordpress.com/2017/10/img_29001.jpg?w=261&h=261)


![IMG_2821[1]](https://busterup.files.wordpress.com/2017/10/img_28211.jpg?w=382&h=510)
![IMG_2849[1]](https://busterup.files.wordpress.com/2017/10/img_28491.jpg?w=428&h=371)
![IMG_2829[1]](https://busterup.files.wordpress.com/2017/10/img_28291.jpg?w=372&h=496)